1. Introduction : Secrecy in the Digital Age
Your email communications are currently encrypted using TLS, but are they truly confidential ? Thinking that TLS alone is enough to protect them is like sending a letter in a transparent envelope transported by an armored vehicle : the journey is secure, but the content remains visible to all intermediaries.
2. Asymmetric Encryption : The Magic of Two Keys
To understand the revolution of asymmetric encryption, we must first know its ancestor : symmetric encryption. The idea is simple : Alice and Bob use a single, secret key to encrypt and decrypt their messages. It’s like they share a unique house key.
- Its advantage : It’s very fast.
- Its huge problem : How can Alice securely transmit this secret key to Bob ? If someone intercepts the key during the exchange, all their future communication is compromised. This is the “key exchange problem.”
Asymmetric encryption was born to solve this fundamental flaw. Gone is the single key; in its place is a pair of mathematically linked keys that cannot be deduced from each other.
The padlock analogy is perfect for understanding :
- The Public Key (your padlock) : This is an open padlock that you can copy and distribute to everyone. Anyone can use it to send you something securely.
- The Private Key (your unique key) : This is the only key capable of opening your padlock. You never share it. It is the heart of your digital identity.
This unique architecture offers us two benefits : confidentiality and authenticity.
Ensuring Confidentiality (Encrypting)
This is the primary use. If Alice wants to send a confidential message to Bob :
- She obtains Bob’s public key (his padlock).
- She writes her message, places it in a “box,” and locks it with Bob’s padlock.
- She sends the box to Bob. The message is now unreadable to anyone who might intercept it.
- Bob is the only person who can use his private key to open the padlock and read the message.
Simple, effective, and the key exchange problem is solved.
Proving Authenticity (Signing)
Now, let’s reverse the reasoning. How can Bob be certain that the message he received truly came from Alice, and that it hasn’t been altered along the way ? By signing it.
A digital signature is the equivalent of an unforgeable wax seal.
- Alice writes her message in plain text.
- She uses her own private key to create a unique mathematical “fingerprint” of this message : the signature.
- She sends the plain text message accompanied by this signature.
- Bob receives everything. To verify the origin, he uses Alice’s public key. If the signature matches the message, he has a double guarantee that :
- Authenticity : The message truly came from Alice (only her private key could have created this seal).
- Integrity : The message has not been altered in any way (otherwise, the fingerprint would no longer match).
Encryption ensures no one can read your message. Signing ensures everyone can verify it came from you.
3. PGP vs GPG : A History of Freedom
To understand the difference between PGP and GPG, we must delve into a major ideological conflict of the 1990s : the one between privacy advocates and the NSA.
The Context : The NSA and Controlled Encryption
In the early 90s, the U.S. government, driven by the NSA, sought to impose its vision of encryption. They launched an infamous project : the Clipper Chip. The idea was to embed this chip in all phones and communication devices. It offered robust encryption but with a significant concession : the government would hold a copy of the keys (“key escrow”), guaranteeing them a “backdoor” to listen to any conversation.
It was in this climate of distrust that a computer scientist and activist, Phil Zimmermann, decided to act. Strongly opposed to this philosophy of surveillance, he designed PGP (Pretty Good Privacy) as a weapon of digital resistance. His goal was clear : to offer military-grade encryption without any backdoors, without any compromise. A tool that would allow activists, journalists, and ordinary citizens to communicate knowing that no one, not even the NSA, could listen in.
 Image by Matt Crypto and Beao, licensed under CC BY-SA 3.0, via Wikimedia Commons.
In 1991, he released PGP on the internet with a message : “If privacy is outlawed, only outlaws will have privacy.”
The reaction of the U.S. government was swift and severe. At that time, strong encryption software was classified as “munitions,” and its export was a federal crime. By spreading globally via the internet, PGP technically violated this law. Phil Zimmermann found himself facing a criminal investigation for “illegal export of weapons.”
For three years, the creator of PGP became a symbol of the fight for the right to encryption. To circumvent the law, enthusiasts printed the entire source code of PGP in a book. Since the export of a book was protected by freedom of speech, anyone could buy it abroad, scan the code, and recompile it (PGP : Source Code and Internals). Facing mobilization from the community, the government eventually dropped the charges in 1996.

This battle, known as the first “Crypto War,” proved that a tool for freedom could not depend on a single person or company. To be trustworthy, it had to be a common good, free and verifiable by all.
From this idea, the OpenPGP standard was born.
In 1999, building on this standard, German developer Werner Koch created GPG : GNU Privacy Guard. It was a complete, entirely free, and open-source rewrite, ensuring that no one could ever hide a backdoor in it.
In summary :
- PGP is the pioneer, the activist act that challenged the NSA’s vision of surveillance.
- GPG is its spiritual heir, the free and modern implementation we use today.
4. Use Cases : What is it Used for Concretely ?
Now that we understand the philosophy and operation of PGP/GPG, let’s see where this powerful technology makes a daily difference. Far from being a mere gadget for paranoids, GPG is a cybersecurity Swiss Army knife used in many professional contexts.
1. Securing Emails
This is the historical application. Encrypting your emails with GPG ensures that only your intended recipient can read the content of your exchanges. This is essential for communicating sensitive information : passwords, confidential documents, company strategies, or simply protecting your personal privacy. Furthermore, signing your emails proves to your correspondents that the message authentically came from you and has not been spoofed.
2. Signing Git Commits
This is an important point for any developer. When you work on a project, signing your Git commits with your GPG key provides cryptographic proof that you are the one who wrote and approved that piece of code. Platforms like GitHub or GitLab will then display a “Verified” badge next to your commits.
Why is this so important ? It protects the project against malicious code injection by someone impersonating a developer. It is a fundamental security practice in modern software development (DevSecOps).
3. Verifying Software Integrity
When you download software, a Linux distribution, or even an update, how can you be sure that the file hasn’t been corrupted or modified by an attacker to include malware ? Serious publishers release a “signature” (often an .asc or .sig file) alongside the download file. With a simple GPG command, you can use the publisher’s public key to verify that the signature perfectly matches the downloaded file.
4. Encrypting Files and Backups
GPG is not limited to communications. You can use it directly on your machine to encrypt any file or folder. This is extremely useful for :
- Archiving sensitive documents (contracts, passport scans…).
- Protecting your backups before sending them to a cloud storage service or an external hard drive. If your backup is stolen, the data it contains will remain an inviolable secret.
5. Creating Your First GPG Key
Now, let’s look at the different steps to create our first PGP keys.
1. Installing GPG
First and foremost, you need to ensure that GPG is installed on your machine.
- On Linux : GPG is almost always pre-installed. To check, open a terminal and type
gpg --version. If the command is not found, install it with your package manager (sudo apt install gnupg). - On macOS : The simplest method is to use the Homebrew package manager. In the terminal, type :
brew install gnupg. - On Windows : The Gpg4win project offers a complete graphical installer that includes GPG and tools to easily integrate it. Download it and follow the instructions.
Once the installation is complete, open your terminal (or CMD / PowerShell on Windows) to continue.
2. Key Generation : The Core Process
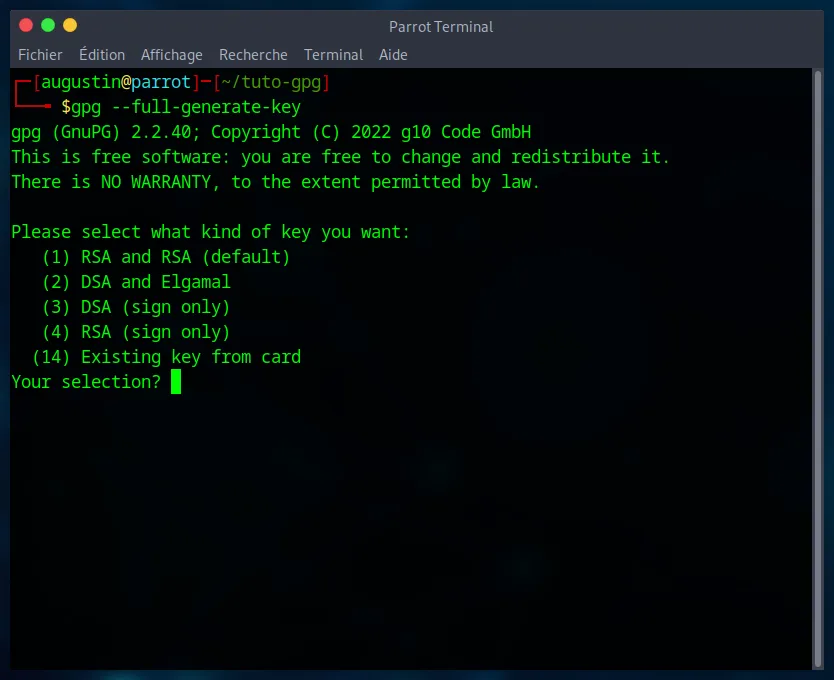
We will use a single command to launch the key creation wizard :
gpg --full-generate-keyThe wizard will ask you a series of questions. Here are the recommended choices and why they are important.
1. Key Type
I recommend choosing the first option; the RSA algorithm is the most universal and compatible. It allows for both encryption and signing, covering all our needs.
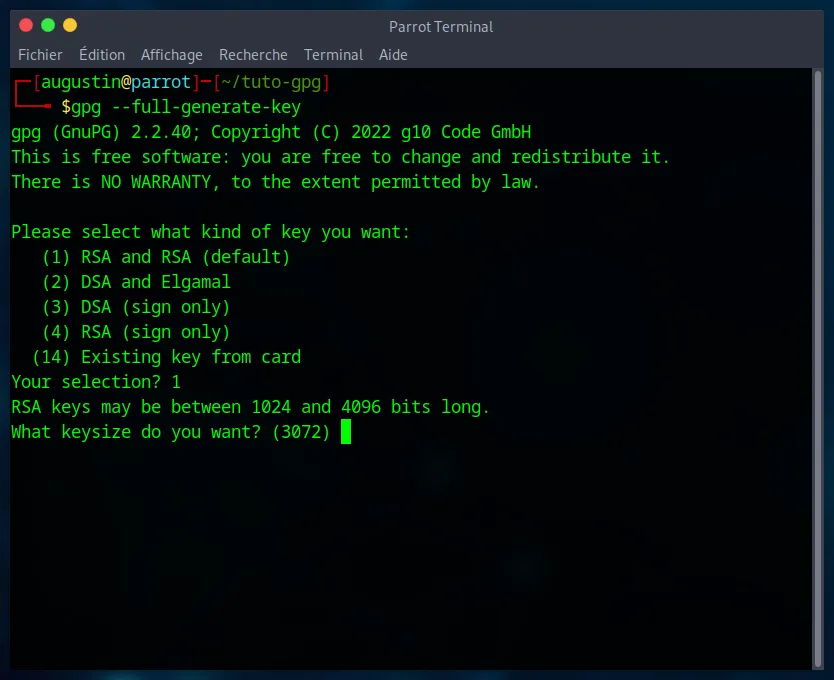
2. Key Size
The key size determines its robustness against brute-force attacks. 4096 bits is the current standard for long-term security.
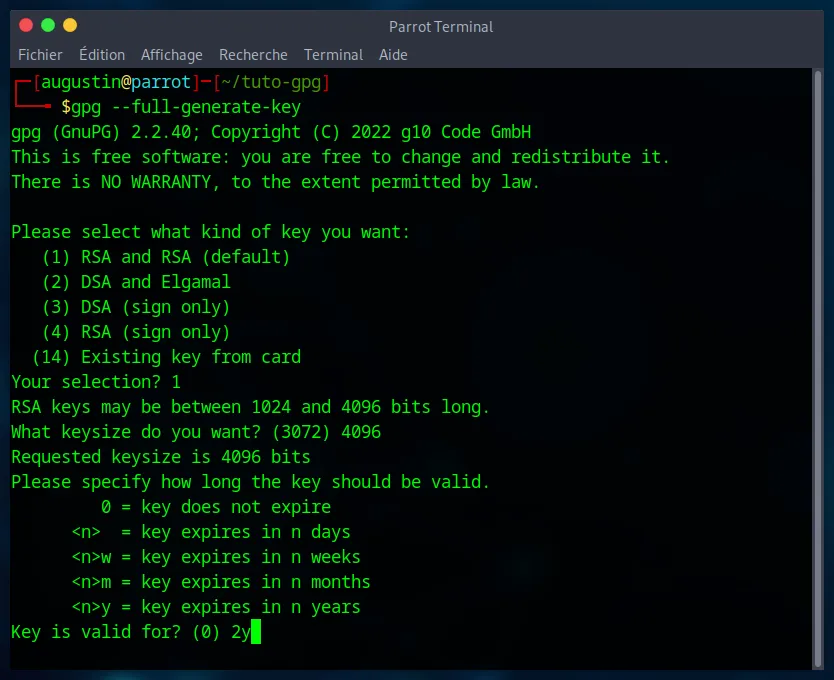
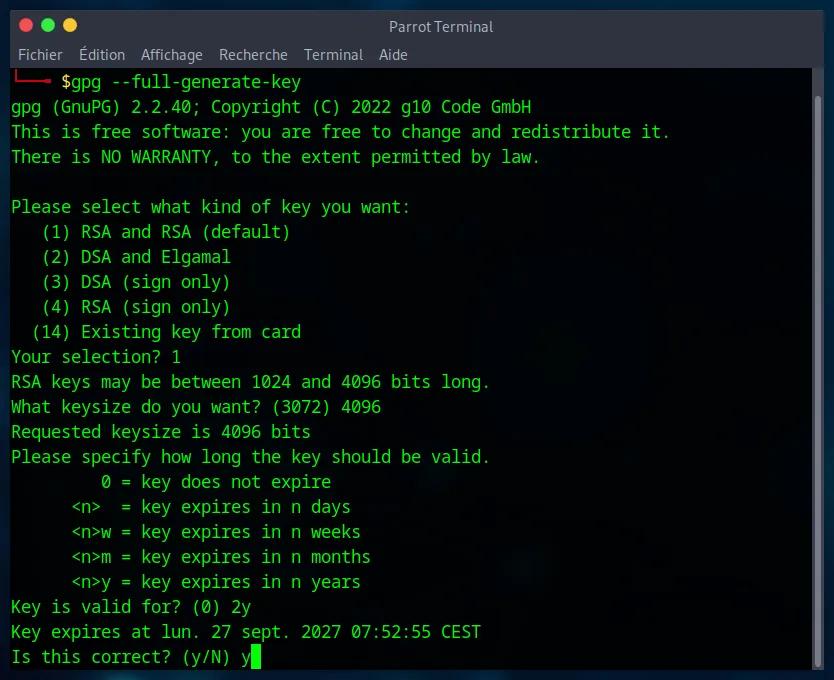
3. Expiration Date
This security measure is important. A key without an expiration date that is compromised/lost poses a danger. By setting an expiration date, you force yourself to review your security regularly. You can, in any case, extend the lifespan of your key before it expires.
4. Your Identity
Now we need to provide some information about ourselves. Our first name, last name, and email, we also have the option to add a comment. It is important to use your real information here : this is your digital “business card” that will be attached to your key and will allow others to verify with certainty that your emails or Git commits truly come from you.
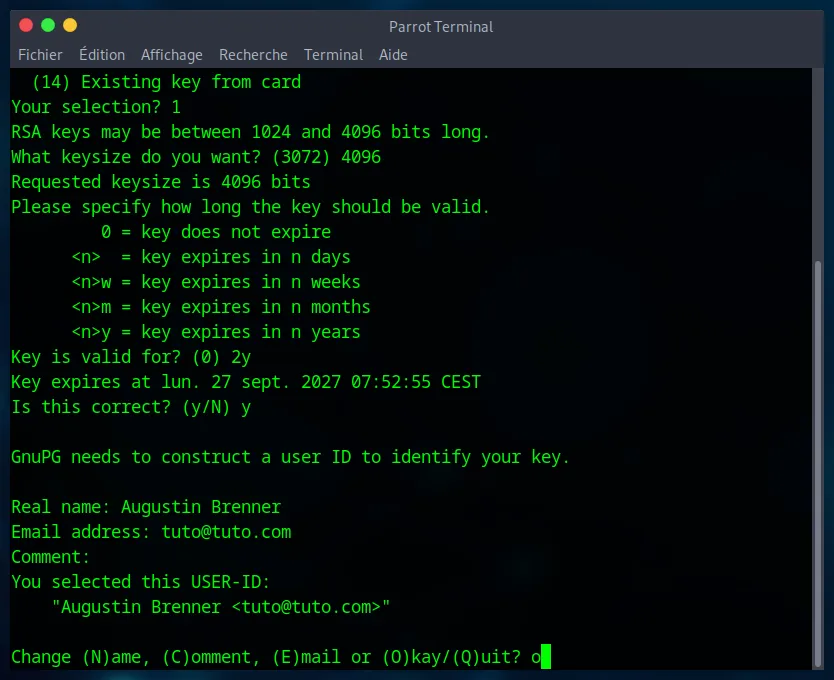
5. The Passphrase Once you validate step 4, a window will open asking for a “passphrase.” This is the password that protects your private key on your computer. It must be :
- Long : Think of a phrase rather than a simple word.
- Unique : Do not use a password you use elsewhere.
GPG will then generate your key, which may take a few seconds. It might ask you to move your mouse or type random text to generate “entropy” (randomness).
Now your PGP/GPG keys are created !
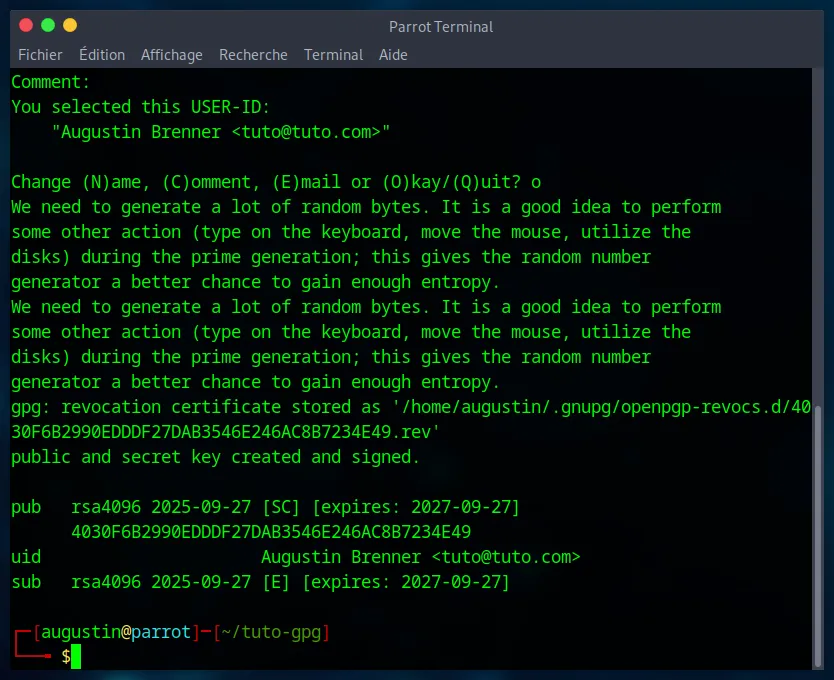
Next, we will create the revocation certificate. This is very important; it’s a file that will allow you to publicly invalidate your key if you ever lose your private key or if your passphrase is compromised.
First, list your keys to find your identifier with the command :
gpg --list-secret-keys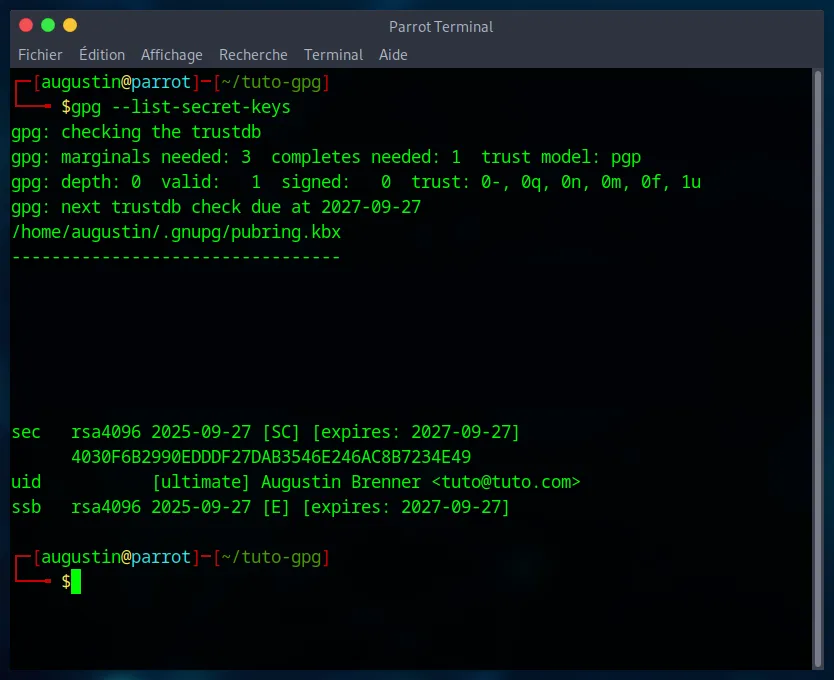
Locate the line starting with sec. The identifier is the long string of characters after rsa4096/. In my case, the identifier is : 4030F6B2990EDDDF27DAB3546E246AC8B7234E49.
Now, generate the certificate with this command (replace [YOUR_ID]) :
gpg --output revoke.asc --gen-revoke [YOUR_ID]GPG will ask you to confirm and enter your passphrase. Then, after answering a few questions, a revoke.asc file will be created.
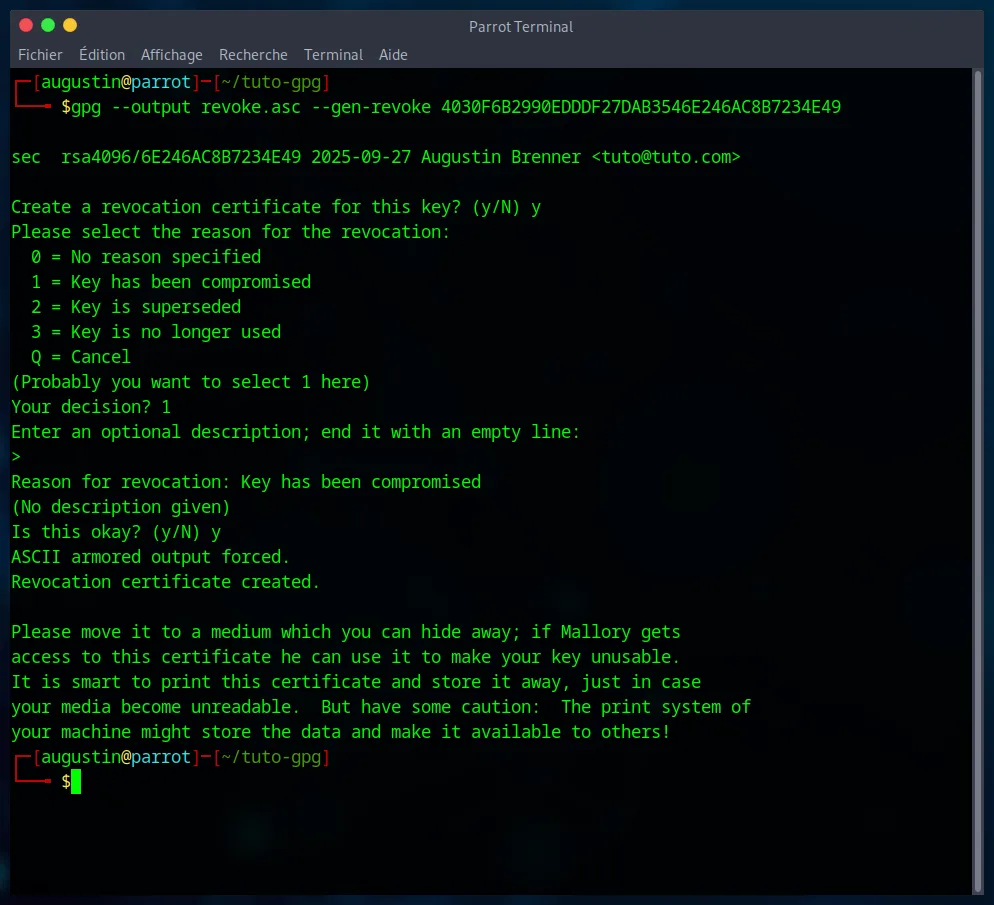
As the message indicates, it is very important to store this key (the revoke.asc file) in a secure location, such as on an encrypted USB stick that would be kept in a safe place offline. It is also important to delete the original file from your computer so that this revocation key is only accessible via the secure USB stick.
In case of compromise, this file is the only way to protect yourself.
6. Using Your GPG Key Daily
Now that your keyring is ready and secure, let’s learn how to use it. Here are the essential commands for managing your keys, communicating securely, and integrating GPG.
1. Managing and Sharing Your Public Key
Your public key is your “padlock.” For others to send you encrypted messages or verify your signatures, they must possess it.
-
List your public keys : To see the keys you own (yours and those you will import).
gpg --list-keys -
Export your public key to a file : This is the simplest method for sharing it. This will create a
public_key.ascfile that you can send by email or put on your website.gpg --armor --export [YOUR_EMAIL_OR_ID] > public_key.ascThe
--armoroption creates a text file (Base64 encoded) rather than a binary file, which is easier to share. -
Publish your key on a key server : Key servers act as a directory. By publishing your key there, you allow others to find it easily.
keys.openpgp.orgis a modern, privacy-respecting choice.gpg --send-keys --keyserver keys.openpgp.org [YOUR_ID]
2. Importing a Contact’s Public Key
To write to someone, you must first possess their public key.
-
Import from a file : If someone sends you their
.ascfile, import it with :gpg --import public_key.asc -
Search and import from a key server : If you know your contact’s email address, you can search for their key on a server.
gpg --search-keys --keyserver keys.openpgp.org "[CONTACT_NAME_OR_EMAIL]"
3. Encrypting, Decrypting, Signing, and Verifying
Here are the four fundamental GPG operations.
-
Encrypt a file (for confidentiality) : This creates a
document.txt.gpgfile that only your recipient can read.gpg --encrypt --recipient [RECIPIENT_EMAIL] document.txt -
Decrypt a file : When you receive a
.gpgfile, decrypt it with :gpg --decrypt document.txt.gpg > decrypted_document.txtGPG will ask for your passphrase to unlock your private key.
-
Sign a document (for authenticity) : This creates a cleartext signature in a
document.txt.ascfile. The message remains readable, but its origin and integrity are guaranteed.gpg --clearsign document.txt -
Verify a signature : When you receive a signed file (
.asc), verify its authenticity with :gpg --verify document.txt.ascGPG will indicate if the signature is “good” and who the author is.
4. Integrating GPG with Your Tools (Git & Emails)
The true power of GPG is revealed when it integrates with your software.
-
With your emails : Some modern email clients can manage GPG. In Thunderbird, for example, OpenPGP support is now native. Simply go to your account settings, “End-to-end encryption” section, and associate your key. The software will then handle encrypting/signing/verifying for you. For Gmail, I use the Mailvelope extension, which I find quite good.
-
With Git : To sign your commits, you must first tell Git which key to use.
-
Find your key ID (the same one used for the revocation certificate) with
gpg --list-secret-keys. -
Configure Git :
git config --global user.signingkey [YOUR_KEY_ID] -
To sign a specific commit, add the
-Soption :git commit -S -m "Your commit message" -
To sign all your commits by default (recommended) :
git config --global commit.gpgsign true
From now on, all your commits on GitHub or GitLab will be able to display the “Verified” badge, attesting to your identity.
-
7. The “Web of Trust” : Decentralized Trust
We now know how to use our keys. But an essential question remains : when you import a contact’s public key from a server, how can you be absolutely certain that it belongs to that person and not an impostor ?
This is the problem of identity validation. To solve it, there are two main philosophies.
The Centralized Model : Certificate Authorities (HTTPS/TLS)
This is the system used by secure websites (the “green padlock”). In this model, central and recognized organizations, Certificate Authorities (CAs), act like a prefecture or passport office. A website submits proof of its identity to them, and in return, the CA signs its certificate. Your browser natively trusts a list of these “authorities” and therefore considers their certificates valid. It’s a hierarchical, simple, and effective system, but it relies on blind trust in a handful of central actors.
The Decentralized Model : The Web of Trust (PGP/GPG)
PGP/GPG was designed with a spirit of distrust towards any central authority. It therefore uses a radically different model : the Web of Trust.
The idea is simple and based on our social relationships : I trust my friends’ friends.
Imagine the following situation :
- You meet someone who introduces themselves as “Alice.” You have no way of verifying if it’s really her.
- But suddenly, your very close friends, Bob and Charlie, whom you know and implicitly trust, come to you and say : “Yes, we confirm, we have verified her identity, it is indeed Alice.”
- Empowered by Bob and Charlie’s validation, you can now extend your trust to Alice.
The Web of Trust is exactly that. “Validating someone’s identity” means signing their public key.
When you sign Alice’s key with your own private key, you make a public declaration : “I, [Your Name], certify that I have verified this key genuinely belongs to Alice.”
The more a key is signed by other trusted individuals, the stronger its legitimacy within the “web.” The system no longer relies on a superior authority but on a network of cross-authentications between users. To facilitate this process, the community even organizes “key signing parties,” events where people physically meet to verify each other’s identities (with ID cards) and mutually sign their GPG keys.
This model is more demanding because it requires each user to be an active link in the chain of trust. But it is also infinitely more resilient and democratic : there is no central authority that can be corrupted, compromised, or decide who is “trustworthy.”
8. Conclusion
It’s not a complicated tool, but it is powerful. I encourage you to create your own key and start signing your Git commits. It’s an excellent habit to adopt that demonstrates a true commitment to security in the development world.